![]()
WP Pixel Integration with PrestaShop
Step 1: Download the File
To begin the integration, download the ZIP package available here: wppixelprestashop1.0.11.zip
Once downloaded, this file will need to be uploaded via your PrestaShop admin panel.
Don't forget Step 3: Configuration
Installation for PrestaShop 1.6
Step 2: Module Installation
- Log in to your PrestaShop admin panel.
- Navigate to: Modules → Modules → Add a new module (top-right corner of the screen):
- Click Choose a file, select wppixelprestashop1.0.8.zip, then click Upload this module:

- Once the upload is complete, click Install next to the “Wirtualna Polska Pixel” module.
- After installation, click Configure to proceed to the configuration step.
Installation for PrestaShop 1.7, 8 and 9
Step 2: Module Installation
- Log in to your PrestaShop admin panel.
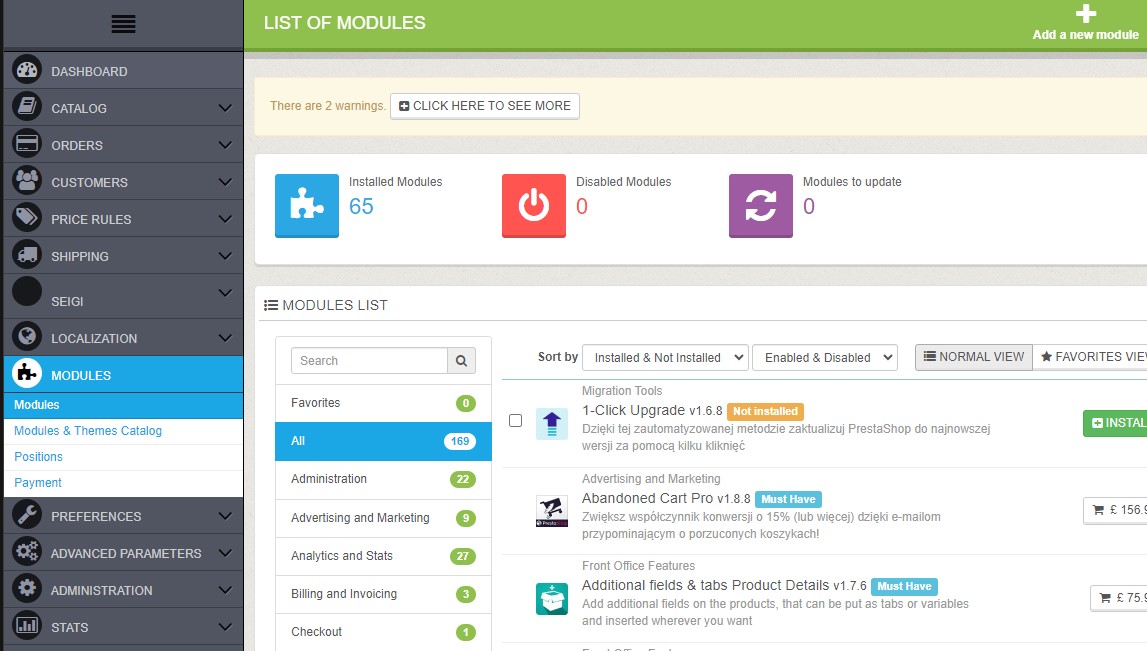
- Go to: Modules → Module Manager → Upload a module:

- Click Choose a file and select the wppixelprestashop1.0.8.zip file:
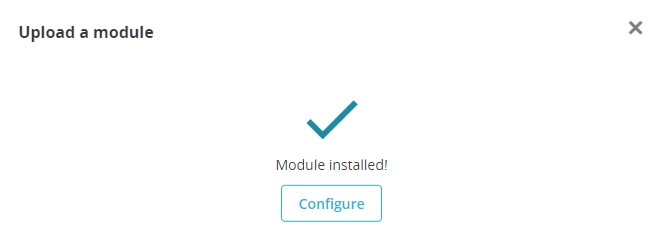
- Wait for the installation to complete, then click Configure:
Step 3: Module Configuration
Applies to PrestaShop versions 1.6, 1.7, 8 and 9
- Pixel ID – Enter the unique Pixel identifier assigned to your store.
- EAN – Select which product field should be passed to WP Pixel as the EAN code.
- Size – Choose the attribute (e.g., size) from the product page to pass to WP Pixel. If such an attribute does not exist, select: Product attributes do not exist.
- Color – Choose the attribute (e.g., color) to pass to WP Pixel. If it doesn’t exist, select: Product attributes do not exist.
-
Popup after adding to cart – Enter the CSS classes or IDs for modal popups triggered after a product is added to the cart. Allowed characters:
, . # - _. -
For PrestaShop 8 and 9, we recommend the default value:
#layer_cart, #blockcart-modal - For PrestaShop 1.7, use:
#layer_cart, #blockcart-notification - GDPR notice is displayed – Select “Yes” if you have a screen where the user must confirm consent to the processing of their personal data.
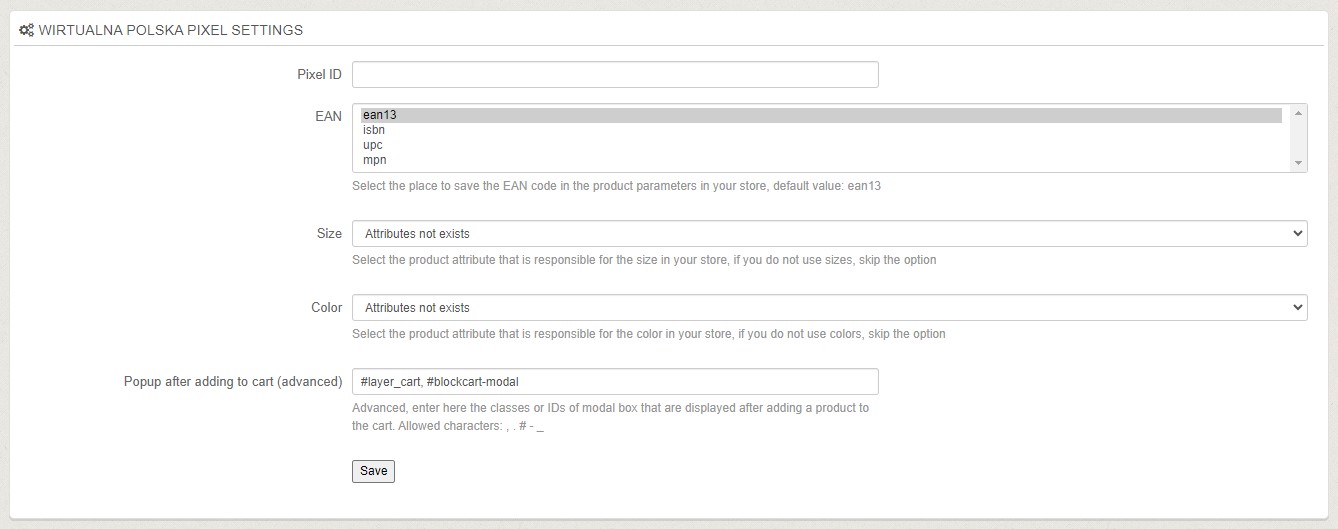
- After completing the configuration, click Save.
Done!
Congratulations! Your WP Pixel has been successfully installed and configured on your PrestaShop store. 🎉
Warning
The Plugin is provided “AS IS”, WITHOUT ANY WARRANTIES, either express or implied, including but not limited to implied warranties of merchantability, fitness for a particular purpose, proper functioning, compatibility with external platforms (such as Shopify, WooCommerce, PrestaShop, or other e-commerce systems), or compatibility with other plugins. Wirtualna Polska Media S.A. does not warrant that the Plugin will be error-free, operate without interruption, or meet the User’s expectations.
TO THE MAXIMUM EXTENT PERMITTED BY LAW, WIRTUALNA POLSKA MEDIA S.A. DISCLAIMS ALL LIABILITY for any damages arising from the use of or inability to use the Plugin, including indirect, consequential, or incidental damages, loss of profits, data, or business interruption, regardless of the legal basis of the claim.
Wirtualna Polska Media S.A. may, but is not obligated to, update the Plugin. The company shall not be liable for any issues resulting from updates, changes to APIs or infrastructures of external platforms (e.g., Shopify, WooCommerce, PrestaShop, or other e-commerce systems), or interactions with other software. The User is responsible for testing the Plugin before production use and bears sole responsibility for maintaining compatibility within their environment. By using the Plugin, the User accepts these terms and assumes all risks associated with its use.
The above provisions do not exclude liability for damages caused intentionally by Wirtualna Polska Media S.A., nor in any cases where such exclusion would be contrary to mandatory provisions of law.